|
Materials Needed/ Preparation
Sheet
1. Sterile HEPES-buffered Modified Steinberg's
Solution (HBSt) with
gentamycin.
2. Axolotl neurulas (Hosts~Stage 25 to maximize
survival; donors~Stage 15)
3. 60 mm Petri
dishes: coated w/ 2% agarose in 1x HBSt
4. 70% Ethanol (EtOH) for sterilization of tools and
pipettes
5. Forceps, tweezers, hair
loops, eyebrow knives and Tungsten microscalpels,
wide-mouthed pipets (for how to make eyebrow knives or
Tungsten scalpels, pls. see References)
Procedure
1. Choose several embryos to 'dejelly'
(remove their jelly coats in order to manipulate them).
First, sterilize all tools with 70 % EtOH, and then dip
them into HBSt. Grasp the jelly coat of the selected
embryo with a pair of forceps. Using a second pair of
forceps, pull away and discard the jelly coat from the
embryo.
2. Allow to sit for a few minutes so that the
vitelline membrane swells. Remove the membrane around the
embryo by gently plucking its surface with a pair of
forceps. Once the forceps have snagged the membrane, use
a second pair of forceps to pull it away from the embryo
entirely. Repeat this for all of the selected
embryos.
3. Choose two embryos, one as a donor and one as the
host. Using a wide-mouthed pipet, transfer both of them
to a Petri dish containing 1xHBSt and antibiotics. Locate
the anterior end of the embryo. Rotate it so that its
neural fold (which looks like a small groove running down
the embryo's dorsal side) is facing up. This part of the
embryo should contain the presumptive eye region.
4. Using an eyebrow knife or a tungsten needle, make
very shallow cuts into the anterior portion of the embryo
in the eye region (Figures 1 and 2).
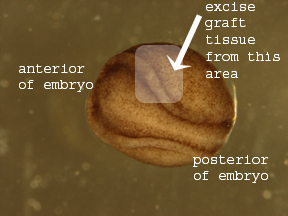
Figure 1. Anterior end of Axolotl
neurula
|
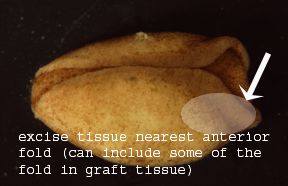
Figure 2. Axolotl neurula (side
view)
|
5. Make four incisions to excise a very thin
rectangular layer of tissue. Do this twice, once on each
side of the anterior region, so that the chances of a
successful graft increase.
6. Keep the graft tissues sterile until they are ready
to be transplanted.
7. Using hair loops to move the embryos and graft
tissues, position the albino host embryo with the neural
folds to one side, so that its flank faces up. Locate the
anterior end of this embryo. The incision should be made
closer to the anterior end than to the posterior end, as
this is likely to increase chances of a graft taking,
since anterior cells are more likely to be competent to
respond to eye-forming signals than posterior cells.
However, do not make the incision in the head region, as
this tissue is also eye precursor - then the experiment
will not truly test whether the graft cells have been
determined as eye cells or not.
7. Posterior to the head region, carefully make an
incision a little bigger than the size of the graft
tissue, running from the anterior end to the posterior
end. Be careful not to cut too deep.
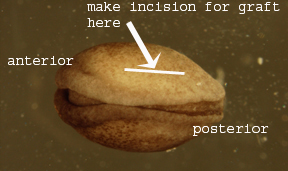
Figure 3. Where to place the graft in a host Axolotl
neurula
8. Transfer the grafts to the Petri dish
containing the host embryo. Place one graft into the
incision. Make sure it is firmly in the incision and not
merely on top of it, so it will stay in place once the
incision heals. The easiest way to do this is to simply
push the graft into the incision with the blunt side of a
tungsten needle.
9. Take photographs of the host embryos.
10. Come back over several days and take photographs
to record and observe any grafts that did take. On the
second day, transfer them to 50% HEPES rearing solution
(the embryos should only be kept in the antibiotic
solution as long as it requires them to heal). Remove any
dead embryos from storage and discard; they will look as
though they have 'exploded' or otherwise will be severely
debilitated. On the third day, move the surviving embryos
to 20% HEPES rearing solution.
|